

Sprucing up your walls doesn’t have to drain your wallet. Cardboard wall decor offers a creative, budget-friendly way to personalize your space. With a few simple materials and a touch of imagination, you can transform plain walls into eye-catching focal points. From geometric designs to playful 3D art, cardboard crafts are lightweight, easy to hang, and endlessly customizable. Let’s explore 22 fun ideas that bring personality, texture, and charm to your home—all without expensive tools or materials.
1. Geometric Cardboard Panels
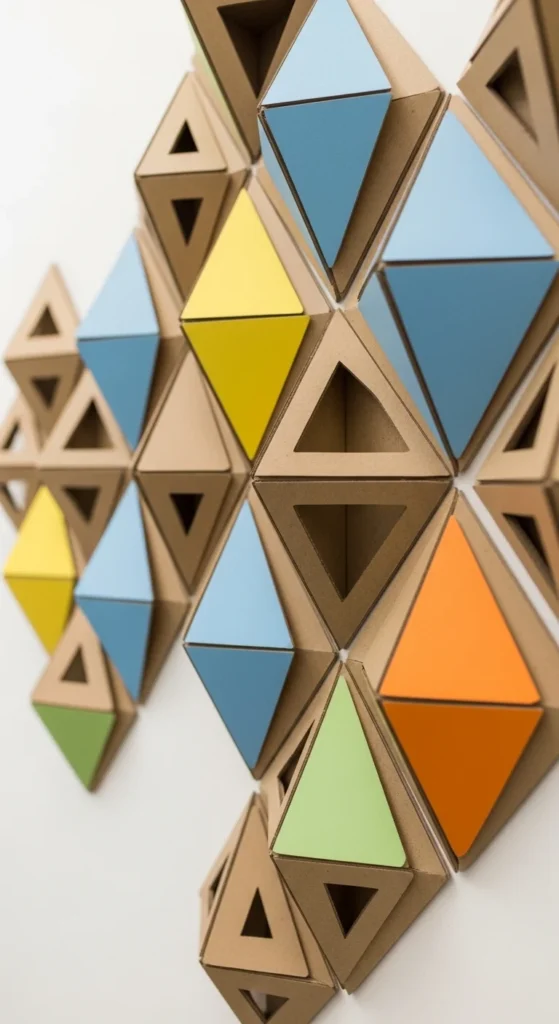
Create simple geometric panels by cutting cardboard into triangles, squares, or hexagons. Paint them in soft or bold colors and arrange in a grid or scattered pattern. Use double-sided tape to attach them to the wall for a no-drill option. Mixing sizes adds depth and interest. For a playful twist, layer smaller pieces on top of larger shapes. This DIY is ideal for a feature wall or above a bed. Budget tip: reuse old cardboard boxes from deliveries.
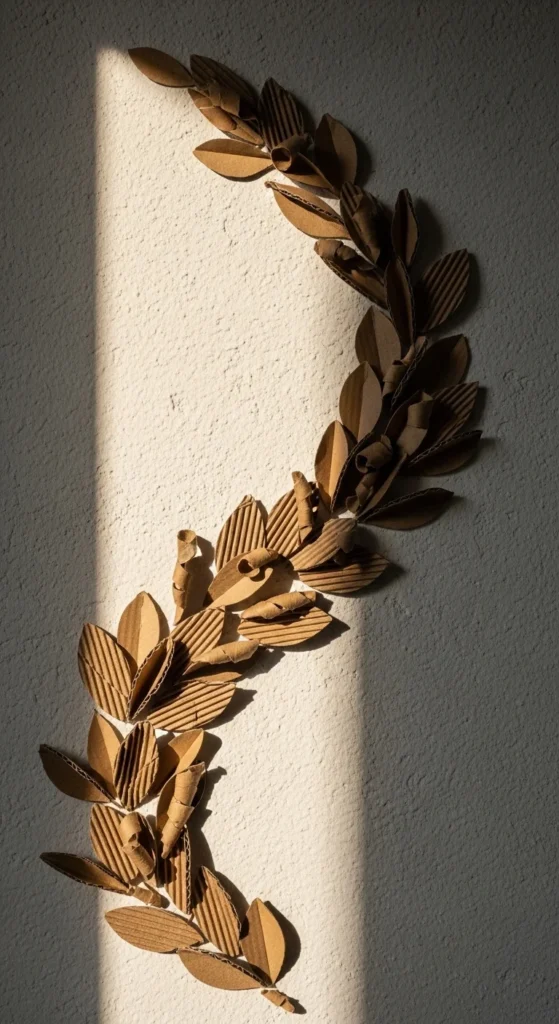
2. 3D Cardboard Leaves
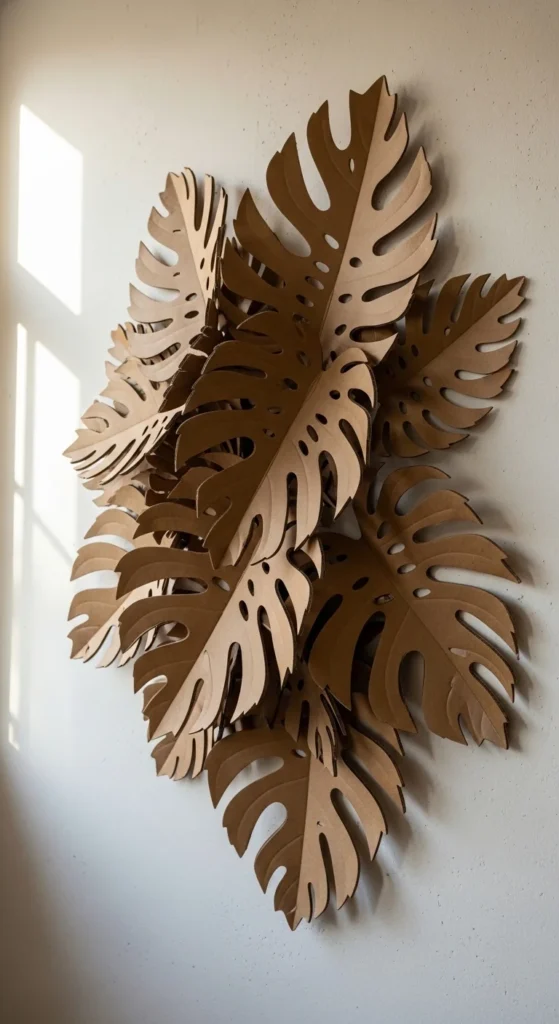
Cut large leaf shapes and fold lightly to add dimension. Paint them green or autumn tones. Arrange in a flowing pattern on a wall to mimic a cascading vine. You can even mix metallic spray paint for a chic touch. Lightweight and easy to reposition, this craft works well in living rooms or hallways. Tip: stack smaller leaves behind larger ones for a fuller look without buying extra materials.
3. Minimalist Cardboard Frames
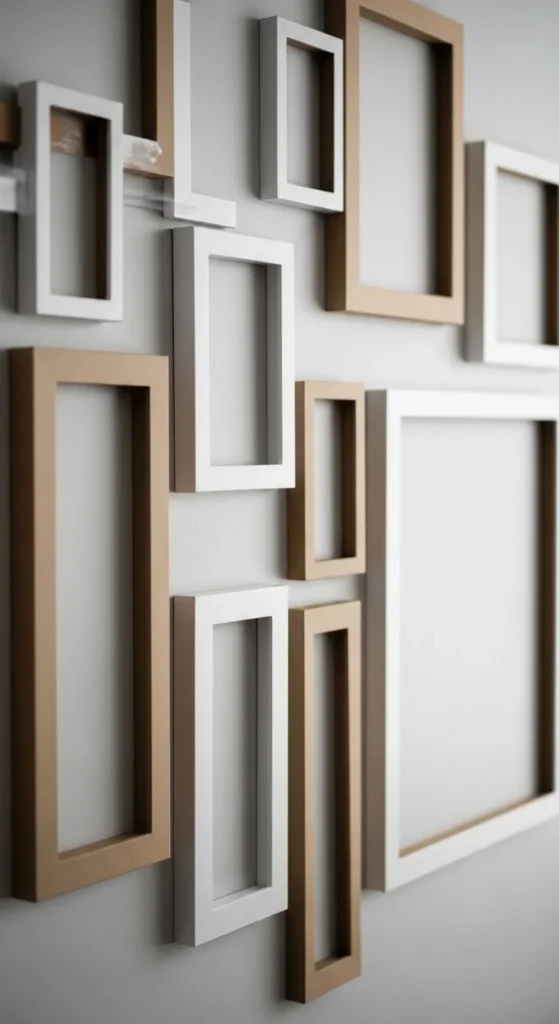
Use cardboard to create simple frames for photos, prints, or postcards. Cut and glue layers for a sturdy finish. Paint or leave natural for a rustic vibe. This approach is cheaper than store-bought frames and allows for fully customizable sizes. Mount with command strips to avoid wall damage. Tip: create a gallery wall using identical frames in neutral tones for a polished look.
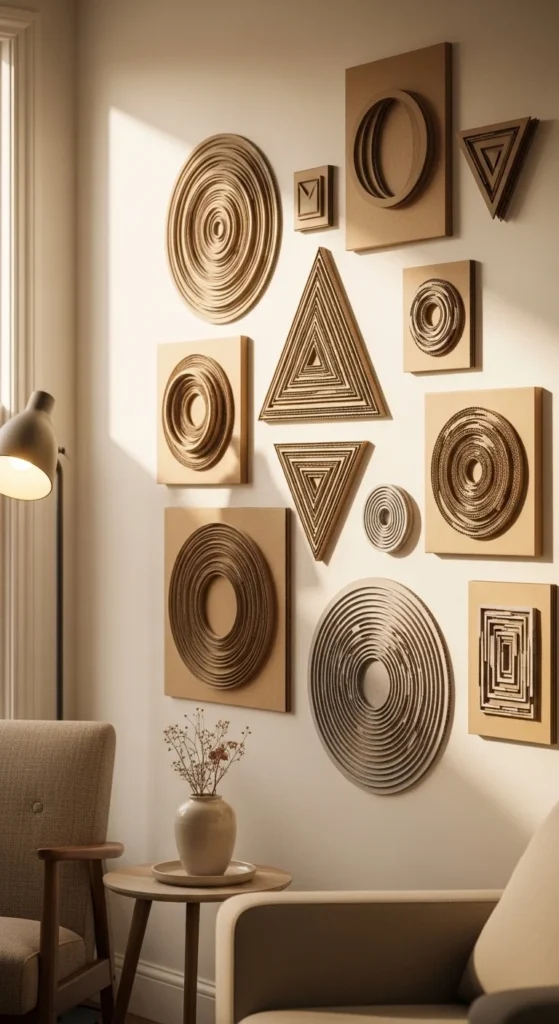
4. Layered Cardboard Mandalas
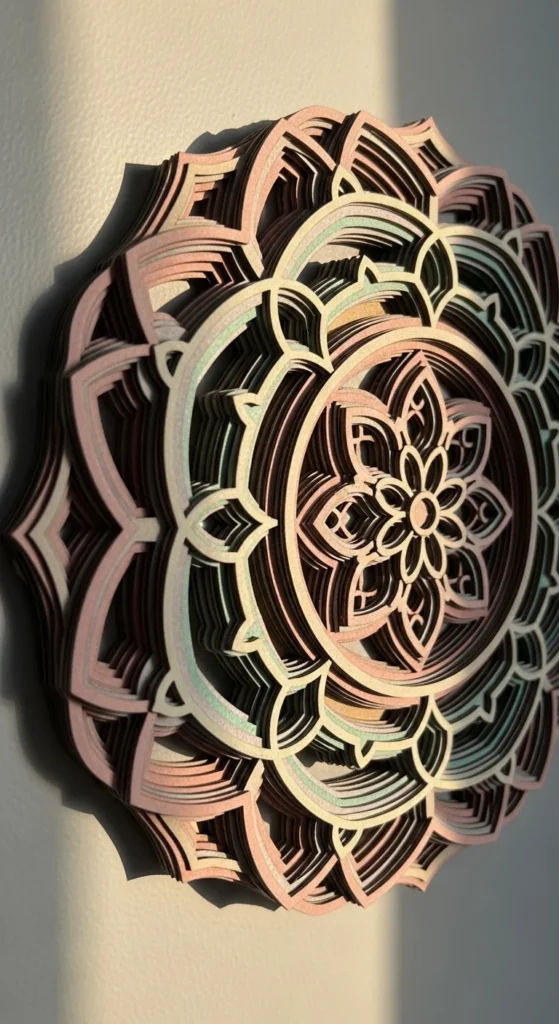
Design mandala patterns by cutting concentric circles and adding shapes like petals or diamonds. Stack layers with small foam spacers to create a 3D effect. Paint each layer in harmonious colors for a calm, artistic vibe. Hang above a couch or in a reading nook for visual interest. Budget tip: trace and cut using cereal boxes or shipping cartons.
5. Cardboard Hexagon Shelf
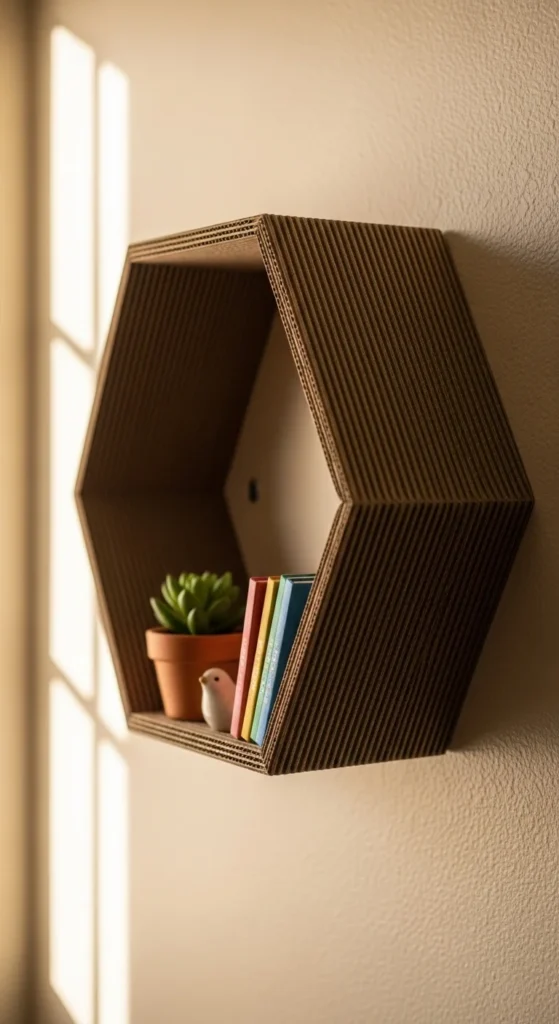
Make functional art with hexagon shelves. Cut thick cardboard for durability and glue layers together. Paint or leave raw for a natural look. Use these to display small plants, candles, or trinkets. Arrange multiple hexagons in a honeycomb pattern for a statement wall. Tip: seal with a thin coat of glue or varnish to strengthen the cardboard.
6. Origami Cardboard Birds
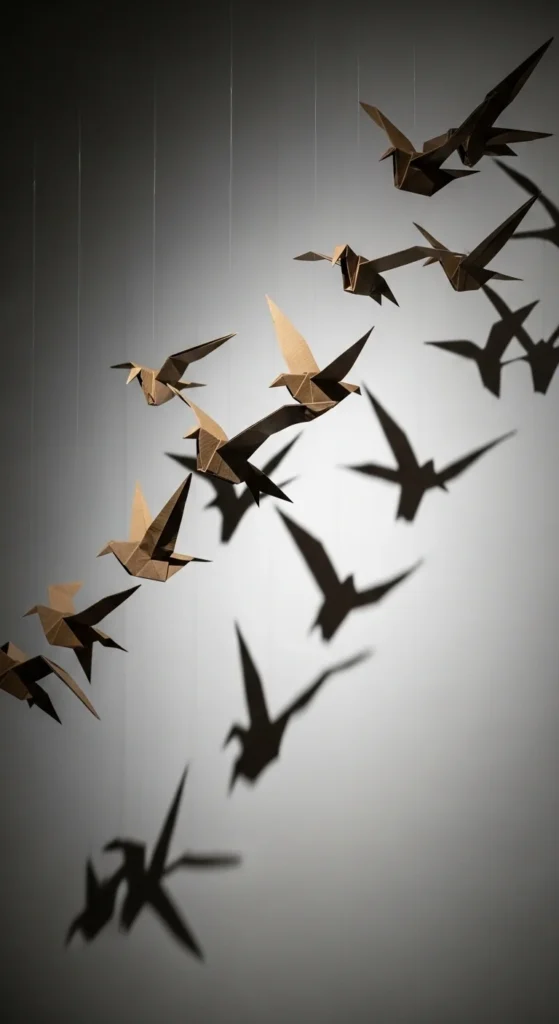
Fold cardboard into origami-style birds and attach with thin string or glue. Hang in clusters to simulate flight or place randomly across a feature wall. Lightweight and whimsical, this adds movement to a static space. Paint in monochrome or soft gradients for a modern look. Budget tip: use leftover packaging cardboard for practice before committing to display pieces.
7. Abstract Cardboard Art
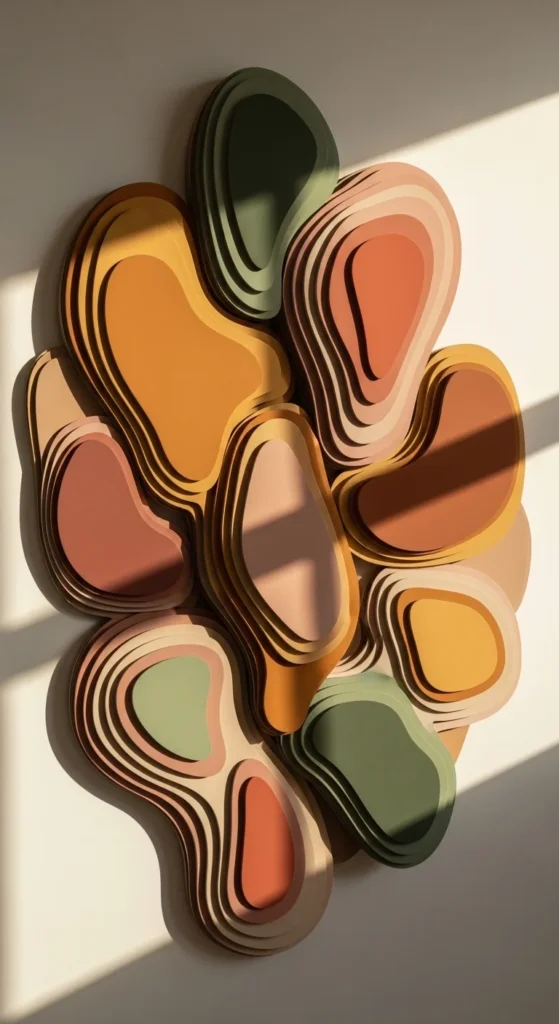
Cut irregular shapes and layer them for abstract wall art. Combine angles, curves, and colors to match your room palette. No two pieces need to be identical. Attach with tape or small nails. This is perfect for living rooms, offices, or entryways. Budget tip: combine paint scraps for a multi-color effect without buying new supplies.
8. Cardboard Typography Signs
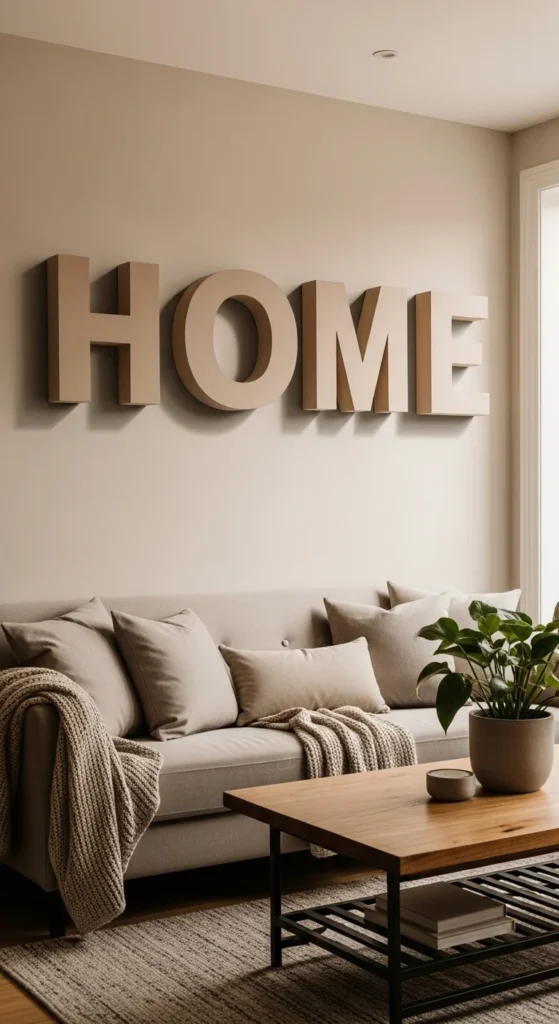
Cut out letters or words for wall typography. Paint or stencil designs on each letter. Hang above shelves, beds, or in a hallway. Lightweight cardboard keeps letters easy to reposition. Tip: create layered letters for a 3D effect without professional tools.
9. Cardboard Wall Pocket Organizer
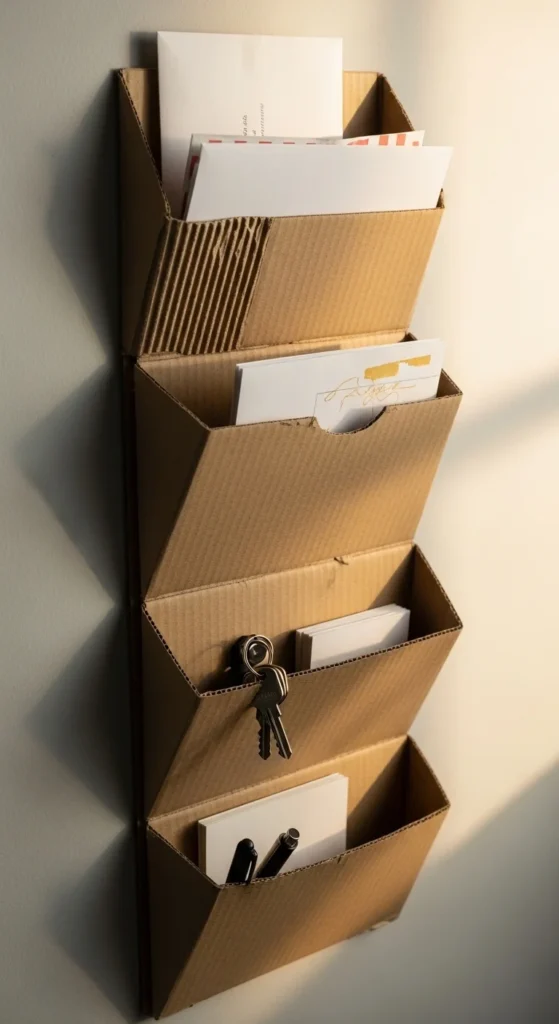
Fold cardboard into pockets and mount as a functional wall organizer. Ideal for keys, mail, or small office supplies. Customize the number of pockets based on your needs. Paint or cover with patterned paper for style. Budget tip: secure with glue and removable strips to avoid damage to walls.
10. Circular Layered Wall Art
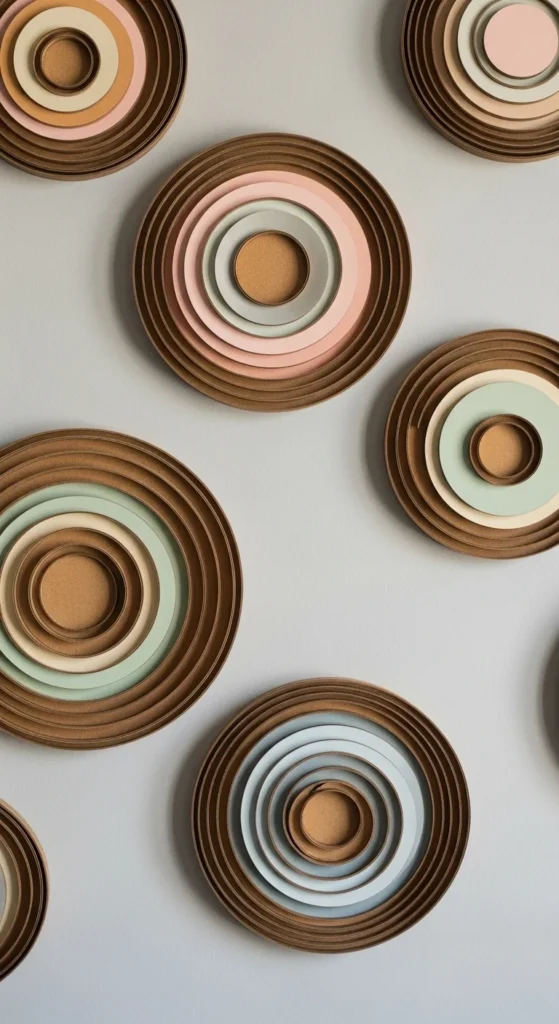
Stack circular cardboard layers to form radial wall art. Paint each layer slightly differently to enhance the 3D effect. Arrange clusters or a single large centerpiece. This craft adds texture without heavy frames. Tip: trace lids or bowls for perfect circles, avoiding costly tools.
11. Cardboard Animal Silhouettes
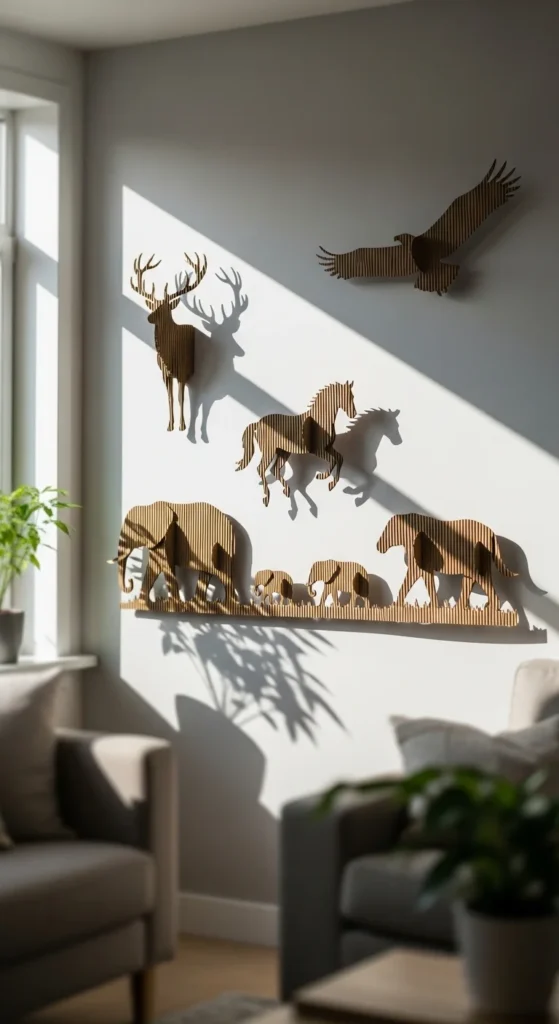
Cut animal shapes—like birds, deer, or elephants—for a playful yet elegant touch. Paint or leave raw depending on room style. Attach with double-sided tape. Great for kids’ rooms or accent walls. Tip: use templates from printouts for clean edges.
12. Cardboard Tassel Garland
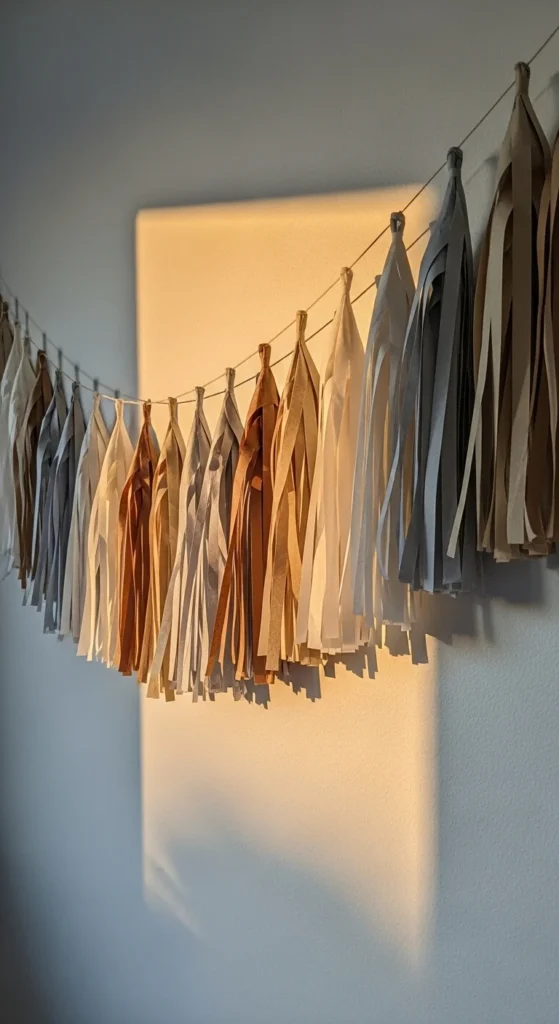
Cut and fringe cardboard to create tassel garlands. Hang vertically or horizontally for texture and movement. Perfect for festive touches or casual wall style. Budget tip: use scrap cardboard strips and thin string, painting only if desired.
13. Layered Square Wall Panels
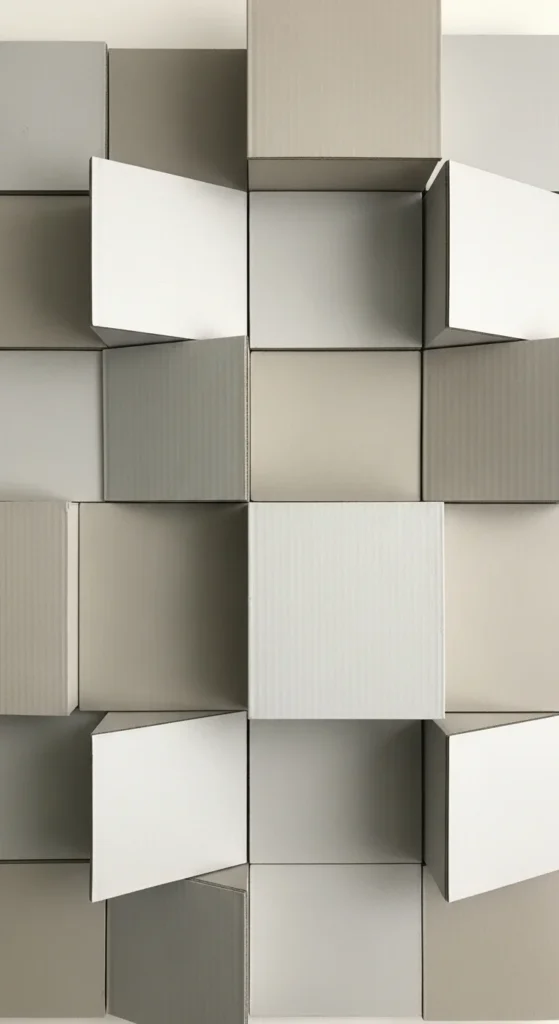
Use squares of varying sizes and stack for layered panels. Play with depth and angles for modern geometric appeal. Can cover small or large wall sections. Tip: alternate natural and painted layers for contrast without extra cost.
14. Cardboard Starburst Design
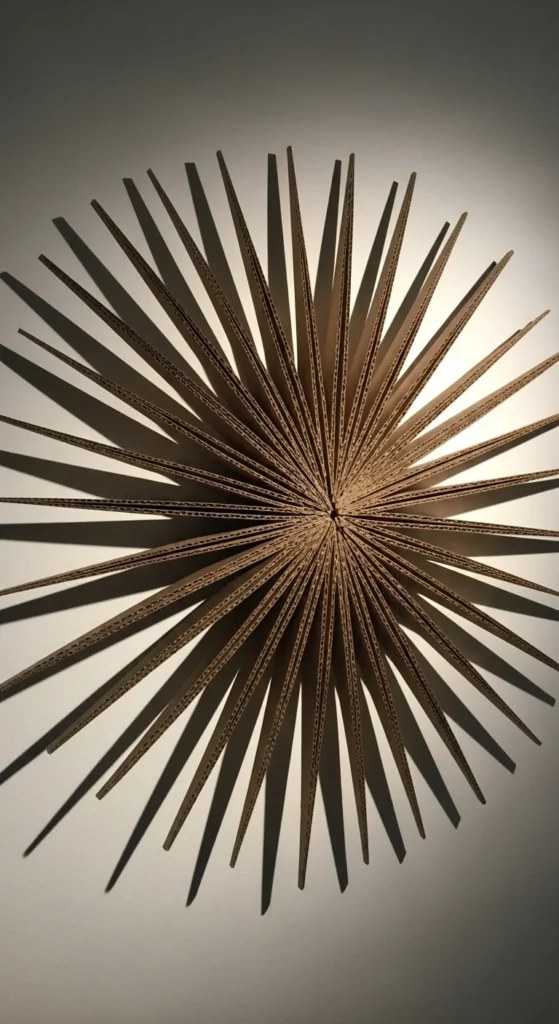
Cut thin strips radiating from a center circle to create a starburst effect. Stack for extra dimension. Paint metallic tones or leave plain for minimalist impact. Works over beds or sofas. Budget tip: combine scrap cardboard pieces, trimming uneven edges for charm.
15. Cardboard Leaf Cluster
Make mini leaf clusters in cardboard and arrange in corners or around frames. Paint seasonal colors or stick with neutrals. Layering adds richness without much cost. Lightweight, easy to adjust, perfect for small accent spaces.
16. Wall-Mounted Cardboard Clock
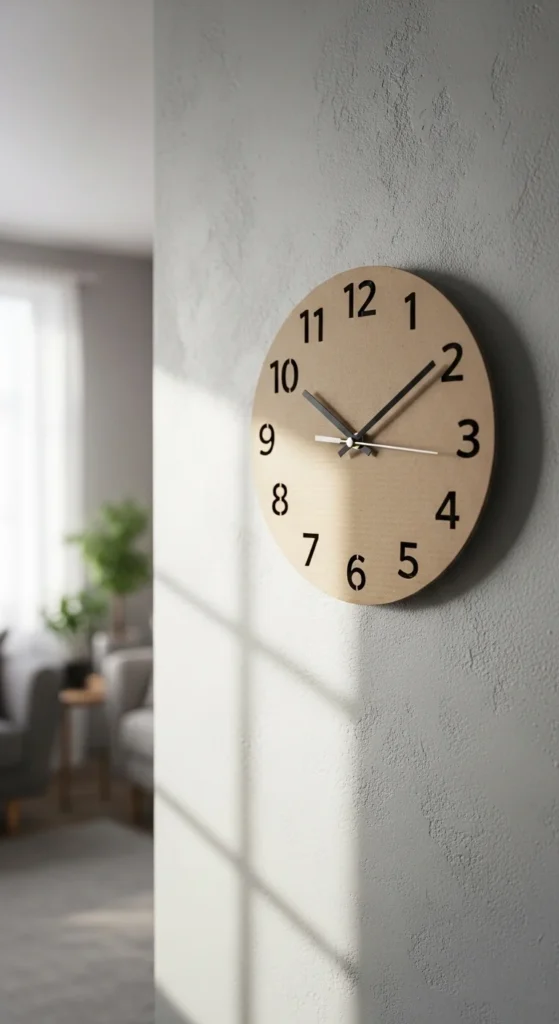
Create a functional wall clock using cardboard as the base. Add numbers and paint for style. Use an inexpensive clock mechanism from craft stores. Lightweight cardboard keeps it safe for walls. Tip: combine layered cardboard for extra depth.
17. Cardboard Curtain Valance
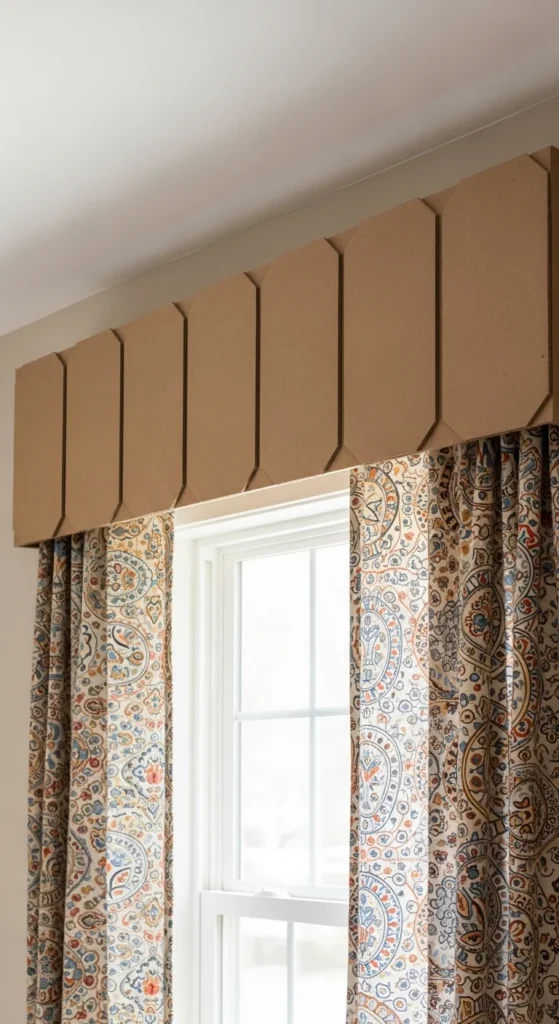
Fashion a valance using lightweight cardboard strips. Paint or wrap with fabric scraps. Adds a subtle architectural element without heavy construction. Tip: secure with removable hooks or command strips to protect window frames.
18. Cardboard Hexagon Mirror Frame
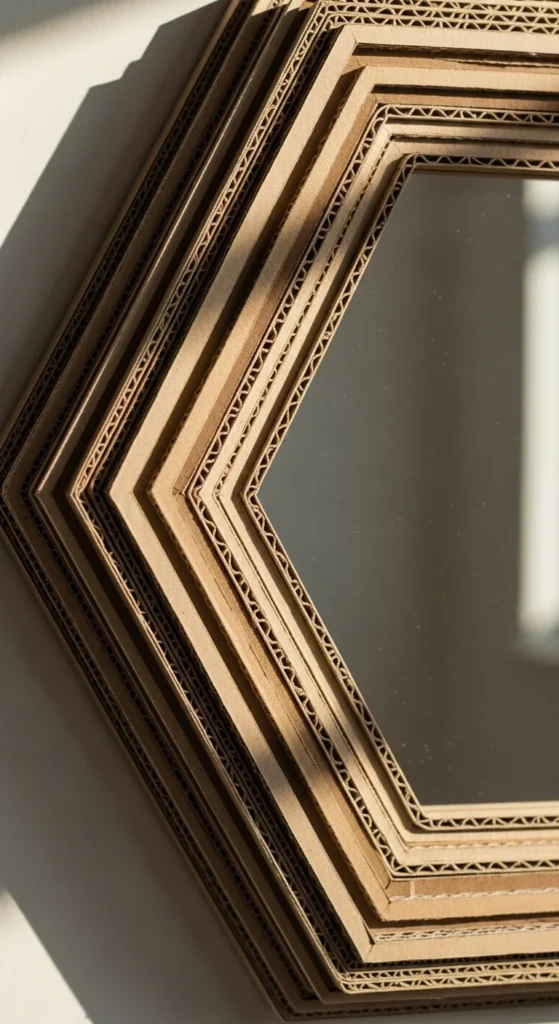
Build a mirror frame with hexagon shapes layered for depth. Paint or cover with paper for style. Works with small or large mirrors. Budget-friendly alternative to wooden frames. Tip: reinforce edges with extra cardboard layers.
19. Floating Cardboard Shelves
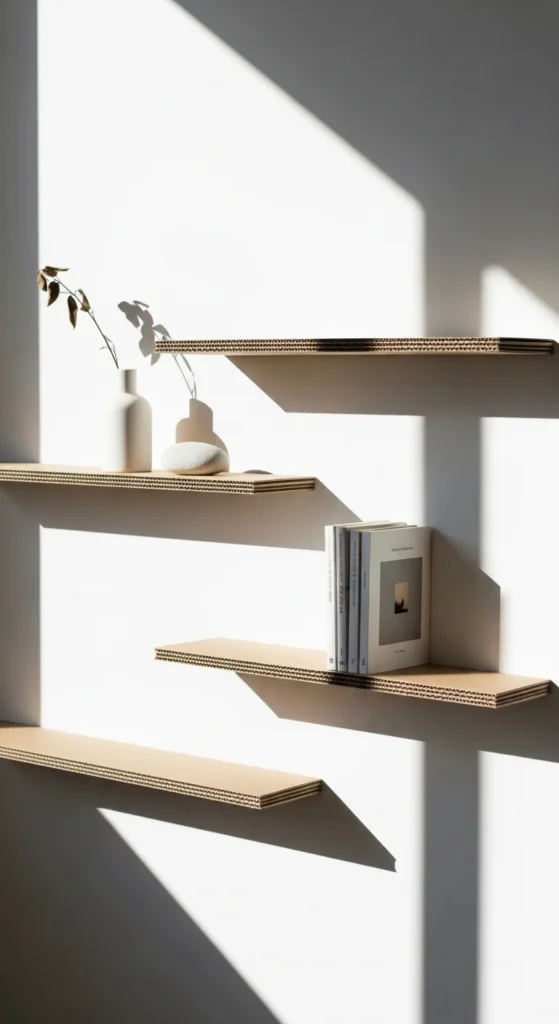
Fold and glue cardboard layers to make floating shelves. Ideal for small plants, candles, or trinkets. Paint or leave natural. Lightweight shelves reduce wall stress. Tip: limit weight to light objects for durability.
20. Cardboard Wall Heart
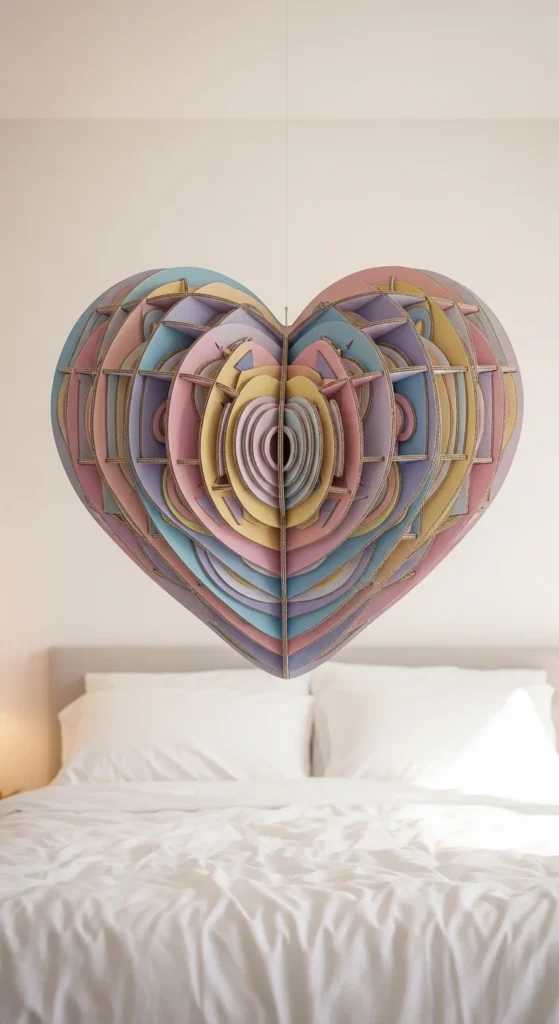
Layer cardboard pieces into a heart shape for romantic or playful décor. Paint or leave raw for rustic charm. Mount with tape or small nails. Budget tip: combine small leftover scraps to build the shape.
21. Cardboard Wave Panels
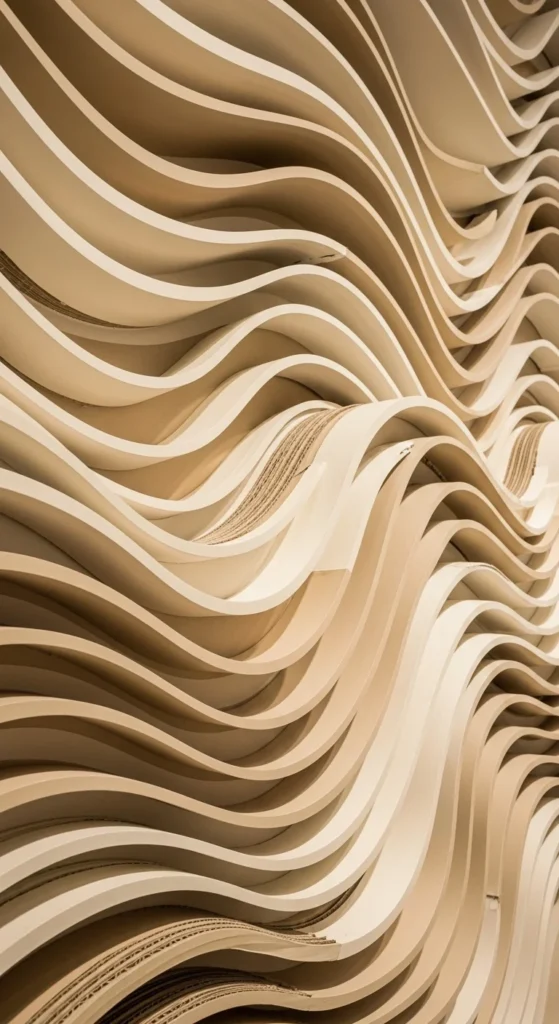
Cut wave-shaped panels and mount to create flowing wall designs. Adds movement and texture. Paint in gradient tones for effect. Lightweight and easy to reposition. Perfect for modern living spaces or bedrooms.
22. Cardboard Word Art
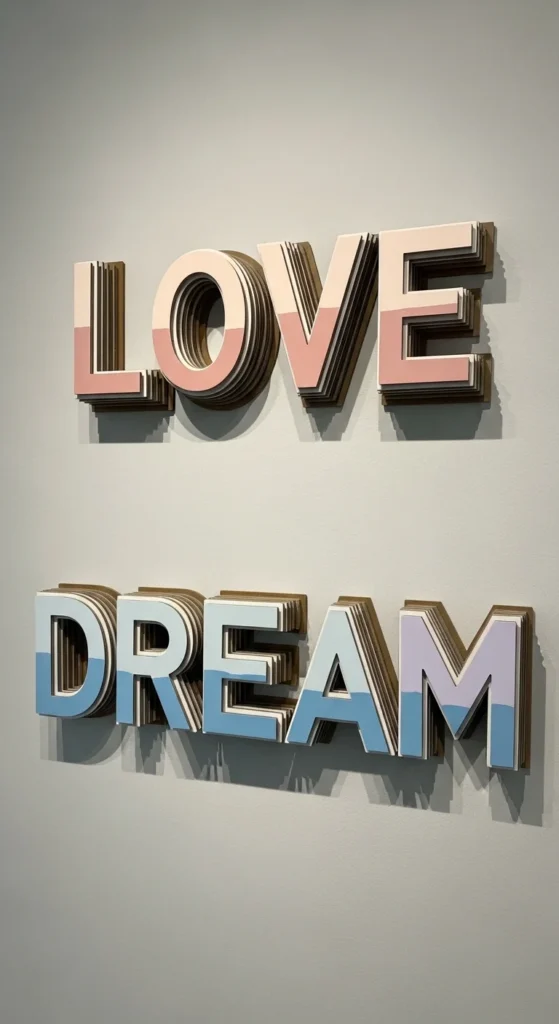
Create inspirational word art by layering cardboard letters. Paint in complementary shades. Mount on walls for easy, personalized décor. Lightweight letters are easy to change seasonally. Budget tip: repurpose shipping boxes for the base layer.
Conclusion
Cardboard wall decor combines creativity, affordability, and versatility. With simple tools and leftover materials, you can design unique art, functional shelves, or playful shapes for any room. Each project offers a way to personalize your home without spending much. Whether you prefer minimalism, 3D art, or playful shapes, cardboard crafts can transform your walls into standout features. Grab some boxes, scissors, and paint, and start crafting today—it’s fun, easy, and budget-friendly.

Leave a Reply